

How To Change Wordpress Max Upload Size
If you're uploading detailed media files or installing large plugins, it's easy to break the default file upload limit for many web hosts. It's a common problem, but thankfully, there are many solutions available.
In this guide, we'll walk you through seven different options for changing the file size limit on your WordPress site. None of them take more than a few minutes to set up.
Note that certain hosts, especially shared hosts, may not let you modify the file upload limit. As such, some of the methods listed below might not work for you. If you have any issues, try a different one.
- Determining Your Current File Upload Limit
- Part 1: The Easy Methods
- Method 1: Contact Your Host
- Method 2: Use a Plugin
- Method 3: Multisite
- Part 2: The Technical Methods
- Connecting to Your Site
- Method 4: Functions.php
- Method 5: Php.ini File
- Method 6: .htaccess file
- Method 7: wp-config.php
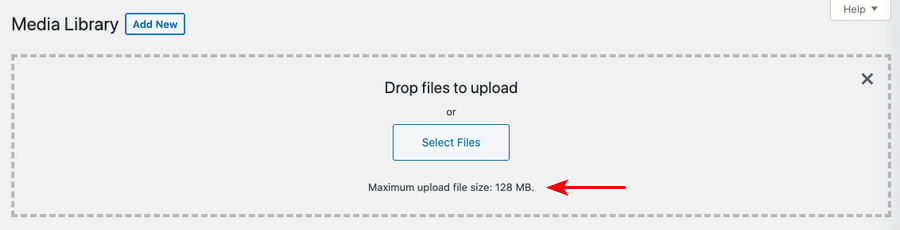
Determining Your Current File Upload Limit
To see your current file upload limit, go to WordPress > Media > Add New to see the current limitation at the bottom of the upload panel.
Part 1: The Easy Methods
These first three methods are the "easy" options. They take the least amount of time and don't require much technical knowledge.

Hello! My name is Sujay and I'm CEO of Astra.
We're on a mission to help small businesses grow online with affordable software products and the education you need to succeed.
Leave a comment below if you want to join the conversation, or click here if you would like personal help or to engage with our team privately.
Method 1: Contact Your Host
If you aren't in a hurry, the easiest thing to do is just contact your web host. They will be able to quickly change it for you. If you don't yet have a host (or are looking to switch to a different one), check out some of our recommended web hosts.
Method 2: Use a Plugin
The easiest way to modify your file upload limit is to install a simple WordPress plugin designed for the task. There are many options available. We recommend the following plugins:
- Tuxedo Big File Uploads
- Upload Larger Plugins
- Upload Max File Size
- Maximum Upload File Size
Simply install a plugin, activate it, and follow the instructions.
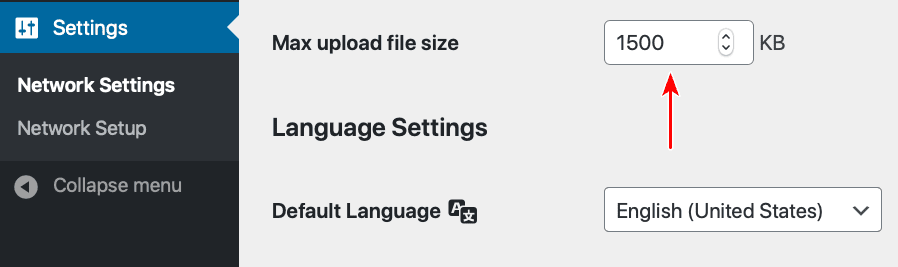
Method 3: Multisite
If your WordPress is running a multisite installation, you can easily change it in the Network settings.
Go to My Sites > Network Admin > Settings . Scroll down to the bottom of the page and change the value for Max upload file size .
Part 2: The Technical Methods
The next 4 methods require you to modify some code on your site. To do so, you'll need to access certain files via your cPanel, Plesk, a File Manager plugin, a FTP/SFTP client, a SSH client, or directly via the WordPress admin panel.
If you're not familiar with programming or PHP, don't panic. You'll only need to copy and paste a few lines of code. No real programming knowledge is required.
Connecting to Your Site
If you don't know how to access your site's directory, check out some of the links below. They will walk you through the process of accessing the files on your website.
If you're totally unfamiliar with FTP, SSH, and similar tools, just install a file browser plugin (the first option below) as it is the absolute simplest way to modify files on your WordPress site.
- Advanced File Manager Plugin
- Using the WordPress Administration Panel
- Using the File Manager in cPanel
- Using Filezilla to Connect to Your Site via FTP/SFTP
- Editing and Uploading Files in Plesk
- Putty (SSH Client) Tutorial
Method 4: Functions.php
This method requires copying and pasting some code into the functions.php file, which is included in all WordPress themes.
Add this code at the bottom of the file, changing the numbers to your desired upload size. The M stands for megabytes, so if your file is 120 megabytes, change the settings to be equal to or greater than 120M.
@ini_set( 'upload_max_size' , '64M' ); @ini_set( 'post_max_size', '64M'); @ini_set( 'max_execution_time', '300' ); - WordPress Admin Panel: Log in to your WordPress admin panel and click on Appearance > Theme Editor on the sidebar. On the right hand side, you should see a list of files. Select functions.php. Add the code to the bottom of the file.
- Other Methods: Connect to your site via FTP/SSH/etc. Navigate to wp-content/themes/[theme-name]. There, you will find the functions.php file. Open it and add the code to the bottom of the file.
Warning: This code will be erased if you update your theme, so it's not a particularly great method to use. Nonetheless, if you'd still like to use it, we recommend using a child theme.
Method 5: Php.ini File
The php.ini file controls many of the settings for your web host. By adding a few lines of code to it, you can modify the file upload limit.
Php.ini should be in the root directory, or top level, of your site. You can access this directory via FTP/SFTP, a file manager WordPress plugin, or CPanel. By default, it is not accessible directly from the WordPress admin panel.
Can't find the php.ini file? Not a problem — just create one yourself. Be sure to save it as a .ini (php.ini) file and not as php.ini.txt.
Inside the file, find the following code and modify the number to suit your needs.
upload_max_filesize = 12M post_max_size = 13M memory_limit = 15M If you can't find the settings (within the already-existing) php.ini file, copy the code above and paste it at the end of the file.
Method 6: .htaccess file
The .htaccess file is a tool that controls the web server. As with the php.ini file, it should be located in the root directory, which is the top level of your website.
Once you've connected to your site and located the file, add this code to the bottom of it, modifying the number to suit your needs:
php_value upload_max_filesize 60M php_value post_max_size 60M php_value memory_limit 15M If you can't find the file, make sure that you have enabled the setting to display "hidden files." The .htaccess file is hidden (hence the odd file name structure), so many file browsers won't display it by default.
If you still can't find the file, go ahead and create a new one in a text editor. Make sure that you save the file in ASCII format (not UTF-8) and that it is simply .htaccess — not htaccess.txt or ht.access or any other variation. Then, add the code to the bottom of the file and upload it to the root directory.
Method 7: wp-config.php
The last method is similar to the previous two. This time, we'll be modifying the wp-config.php file, which is usually in the top level directory (root) of your site. Simply add this code to the bottom of the file, changing the numbers to suit your needs.
@ini_set( 'upload_max_size' , '35M' ); @ini_set( 'post_max_size', '35M'); @ini_set( 'memory_limit', '15M' ); Did one of those methods work for you? Which one was the easiest to do? The hardest? Let us know in the comments!
How To Change Wordpress Max Upload Size
Source: https://wpastra.com/maximum-file-upload-size-wordpress/
Posted by: woodsefuldsider.blogspot.com
0 Response to "How To Change Wordpress Max Upload Size"
Post a Comment